Querying an Account using QueryByAttribute, FetchXML and LINQ

Using the late bound method, here is the same query results using QueryByAttribute, FetchXML and LINQ.  For this example, I wrote a simple Console Application in Visual Studio 2012.

  1. Create a new project and choose Console Application template.
  2. In Solution Explorer, expand the References folder and add the Microsoft.Xrm.Sdk.dll and Microsoft.Xrm.Client.dll from the CRM SDK /bin folder
    2015-02-26_21h48_34
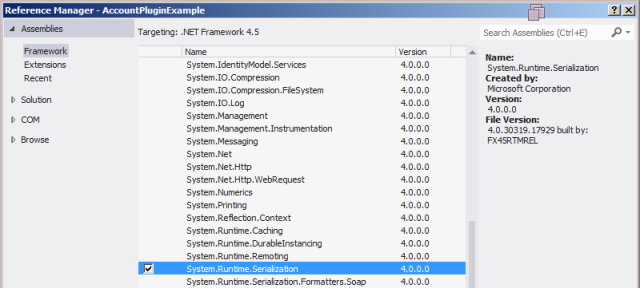
  3. Also add the System.Runtime.Serialization Assembly
    2015-02-26_21h50_15
  4. Your References should look similar to this:
    2015-02-26_21h52_07
  5. In the code for Program.cs the using statements need to include the following:
    2015-02-26_21h53_47
  6. Inside the Main method, the CrmConnection class is used to connect to Dynamics CRM.
    2015-02-26_22h04_50
  7. Use the OrganizationService and OrganizationServiceContext classes to setup the service and orgContext objects.
    2015-02-26_22h07_13
  8. Code for the query expression (QueryByAttribute)
    Console.WriteLine(“==QueryByAttribute==”);

    QueryByAttribute qba = new QueryByAttribute(“account”);

    qba.ColumnSet = new ColumnSet(“name”);

    qba.Attributes.AddRange(“name”);

    qba.Values.AddRange(“ACME”);

    EntityCollection ecqba = service.RetrieveMultiple(qba);

    foreach (Entity acct in ecqba.Entities)

    {

    Console.WriteLine(acct.Attributes[“name”]);

    }

  1. Code for LINQCode for FetchXML
    Console.WriteLine(“==FetchXML==”);

    string fetch = @”

    <fetch mapping=’logical’>

    <entity name=’account’>

    <attribute name=’name’/>

    <filter type=’and’>

    <condition attribute=’name’ operator=’eq’ value=’ACME’ />

    </filter>

    </entity>

    </fetch>”;

    EntityCollection ecf = service.RetrieveMultiple(new FetchExpression(fetch));

    foreach (Entity acct in ecf.Entities)

    {

    Console.WriteLine(acct.Attributes[“name”]);

    }

  1. Console.WriteLine(“==LINQ==”);

    var linq = from a in orgContext.CreateQuery(“account”)

    where (a[“name”].Equals(“ACME”))

    select a[“name”];

    foreach (var acct in linq)

    {

    Console.WriteLine(acct);

    }

  2. The output should look like this:

    2015-02-26_22h21_49

Develop a Simple Dynamics CRM 2013 Plugin without the Template from the SDK

The Plugin Registration Tool from the SDK is needed but the Plugin template for Visual Studio is not.  These steps can be used in Visual Studio 2012 and 2013.

  1. In Visual Studio, open a new project, select Class Library from the C# Templates. For this example, I gave it a name, AccountPluginExample.
    2015-02-20_19h50_16
  2. In Solution Explorer, right-click on References and add the System.Runtime.Serialization.
    2015-02-20_19h52_45
  3. Also add the Microsoft.Xrm.Sdk.dll from the Software Development Kit. You will probably have to Browse and locate the .dll
    2015-02-20_19h54_46
  4. Your References folder in Solution Explorer should look like this:
    2015-02-20_19h56_50
  5. Rename the Class1.cs file to something like AccountPluginClass.cs
    2015-02-20_19h57_24
  6. In the code for AccountPluginClass.cs, remove all of the using statements except for using System; and add using Microsoft.Xrm.Sdk; At this point your code should look like this:
    2015-02-20_19h59_29
  7. Add the interface IPlugin from Microsoft.Xrm.Sdk to the class, AccountPluginClass (line 6). This is the base interface for plugins.  Also add an Execute method which accepts an IServiceProvider  The Execute method executes the plugin code in response to an event. It should look like this:
    2015-02-20_20h11_53
  8. In the Execute method, initialize the IPluginExecutionContext, IOrganizationServiceFactory, and IOrganizationService The code in the Execute method should look like this:
    2015-02-20_20h33_56
  9. In the Execute method, the Target entity is verified that it is an Account entity before any plugin code is executed. The code after line 16 in the Execute method should look like this:
    2015-02-20_20h42_14
  10. Enter the code below on line 27, where the comments read // Your code here. The if statement first checks the Account entity contains an accountnumber field and then enters a random number (look familiar?).  Is the accountnumber  The code should look like this:
    2015-02-21_07h11_41
  11. The entire AccountPluginClass.cs code should look like this:
using System;
using Microsoft.Xrm.Sdk;
namespace AccountPluginExample
{
   public class AccountPluginClass : IPlugin
   {
      public void Execute(IServiceProvider serviceProvider)
      {
         IPluginExecutionContext context =
            (IPluginExecutionContext)serviceProvider.GetService(typeof(IPluginExecutionContext));
         IOrganizationServiceFactory factory =
           (IOrganizationServiceFactory)serviceProvider.GetService(typeof(IOrganizationServiceFactory));
         IOrganizationService service = factory.CreateOrganizationService(context.UserId);
         // Verify that the Target is an entity
         if (context.InputParameters.Contains("Target") &&
            context.InputParameters["Target"] is Entity)
         {
            // Set the Account entity variable
            Entity accountEntity = (Entity)context.InputParameters["Target"];
            // Verify the entity is the Account entity
            if (accountEntity.LogicalName == "account")
            {
               if (accountEntity.Attributes.Contains("accountnumber") == false)
               {
                  Random r = new Random();
                  accountEntity.Attributes.Add("accountnumber", r.Next(1000, 9999).ToString());
               } 
               else
               {
                  throw new InvalidPluginExecutionException("The account number cannot be set")
               }
            }
         }
      }
   }
}
  1. In Solution Explorer, click once on the solution name, AccountPlugExample and right-click and select Properties or press Alt+Enter. In the Properties page, click on Signing and check Sign the assembly.  In the drop-down menu select <New…>.
    2015-02-20_21h17_49
  2. In the Create Strong Name Key dialog, enter a Key file name and a password. A .pfx file should appear in the Solution Explorer after you click on the OK
    2015-02-20_21h19_15
  1. Press the F6 key to build the solution or click on Build in the File menu and select Build Solution. This should create an AccountPluginExxample.dll in the /bin/Debug folder.
    2015-02-20_21h25_30
  2. Locate and execute the file, PluginRegistration.exe in the SDK/Tools/PluginRegistration folder. This is need to register the plugin, steps, and image.
    2015-02-20_21h48_28
  3. Click on the Create New Connection button and fill in the Login information.
    2015-02-20_21h51_48
  4. Once a successful connection to Dynamics CRM is made, open the Register menu and select Register New Assembly or press Ctrl+A.
    2015-02-20_21h54_42
  5. In the Register New Assembly dialog, specify the location of the assembly (Step 1). This is the AccountPluginExample.dll
    2015-02-20_21h58_29
  6. In Step 2, if the Assembly isn’t selected, check the boxes.
    2015-02-20_21h59_49
  7. For Step 3, I select None and in Step 4, I select Database.
    2015-02-20_22h05_59
  8. Click on the Register Selected Plugins A confirmation should appear with the results.  More registration information will appear in the Log (Step 5).  Click the OK to close the dialog window.
    2015-02-20_22h08_53
  9. The new Assembly should appear in the list of Registered Plugins & Custom Workflow Activities. Find the AccountPluginExample Assembly, right-click on it to open the menu, select Register New Step or press Ctrl+T.
    2015-02-20_22h12_02
  10. In the Register New Step dialog, enter Message, choose a Primary Entity (account), and select the Event Handler (AccountPluginExample.AccountPluginClass). In the Event Pipeline Stage of Execution, select Pre-operation.
    2015-02-20_22h17_54
  11. In the Filtering Attributes field, in this example, leave it to All Attributes or select them individually. I’m not really certain what this impacts.
    2015-02-21_07h18_37
  12. Click on the Register New Step The AccountPluginExample Assembly should now include a Step.
    2015-02-20_22h23_32
  13. Now right-click on the AccountPluginExample Assembly and select Register New Image or press Ctrl+I.
    2015-02-20_22h25_48
  14. In the Register New Image dialog, Select a Step, click on the AccountPluginExample Update of account In the Image Type section, check Pre Image and uncheck Post Image.
    2015-02-20_22h32_32
  15. Click on the Register Image The AccountPluginExample Assembly should now include an Image.
    2015-02-20_22h33_08
  16. Lastly, update the Assembly one last time. Click on (Assembly) AccountPluginExample and then click on the Update
    2015-02-20_22h35_41
  17. In Step 1, locate the AccountPluginExample.dll. In Step 2, select the Assembly.  In Step 3, choose None.  In Step 4, choose Database.  Click on the Update Selected Plugins button.
    2015-02-20_22h38_00
  18. The Registered Plugins dialog should appear with the results of the update.
    2015-02-20_22h39_17
  19. In Dynamics CRM, open the Customizations page and open Customize the System.
    2015-02-20_22h44_06
  20. In the Components section, expand Plug-in Assemblies and click on AccountPluginExample. This just confirms the Assembly was added to the CRM.
    2015-02-20_22h46_17
  21. In the Components section, click on Sdk Message Processing Steps. Locate the AccountPluginExample and select it by clicking on the check column.
    2015-02-20_22h52_05
  22. Click on the Activate The Confirmation dialog will prompt you to activate the selected Processing Step.  Click on the Activate button.
    2015-02-20_22h53_32
  23. For good measure, I click on the Publish All Customizations
    2015-02-20_22h55_39
  24. Open an Account I have already added the Account Number to the form, edit a field and then save it.  The Account Number field should then be updated with the random number.
    2015-02-21_07h24_40